
はじめに
ロボットのフレームワークでメジャーなROS2を用いて、公式のサンプルコードをもとに開発の方法をご紹介していきたいと思います。ROS2を使用することでSDKでラップされることなく、Go2の通信と制御を直接行うことができます。
開発環境
- Go2 本体:EDU(二次開発可版)
- 外部PC:Ubuntu 20.0.4 LST
事前準備
Docking Stationと外部PCの接続を済ませておく必要があります。
ROS2 Foxyのインストール
外部PCを通してROS2で開発を行います。Ros2をインストール済みの場合はスキップしてください。
(1)レポジトリの準備
~$ sudo apt update && sudo apt upgrade -y
~$ sudo apt install curl gnupg lsb-release -y
~$ sudo curl -sSL https://raw.githubusercontent.com/ros/rosdistro/master/ros.asc | sudo apt-key add -
~$ sudo sh -c 'echo "deb [arch=amd64] http://packages.ros.org/ros2/ubuntu $(lsb_release -cs) main" > /etc/apt/sources.list.d/ros2-latest.list'
(2)ROS2のインストール
~$ sudo apt update
~$ sudo apt install ros-foxy-desktop -y
(3)「ROS 2」のセットアップスクリプトを「~/.bashrc」に追加。
Ubuntu 起動時に自動実行するようになります。
~$ echo "source /opt/ros/foxy/setup.bash" >> ~/.bashrc
~$ source ~/.bashrc
(4)「ROS 2 」の依存関係ツールのインストール。
「colcon」はビルドツール、「argcomplete」は自動補完ツールになります。
~$ sudo apt install python3-colcon-common-extensions -y
~$ sudo apt install python3-argcomplete
(5)動作確認。それぞれで以下コードを実行してコマンドの実行結果を確認します。
~$ ros2 run demo_nodes_cpp talker
[INFO] [1728804852.487135627] [talker]: Publishing: 'Hello World: 1'
[INFO] [1728804853.487033120] [talker]: Publishing: 'Hello World: 2'
[INFO] [1728804854.487094554] [talker]: Publishing: 'Hello World: 3'
    :
~$ ros2 run demo_nodes_py listener
[INFO] [1728804878.493128370] [listener]: I heard: [Hello World: 27]
[INFO] [1728804879.487816334] [listener]: I heard: [Hello World: 28]
[INFO] [1728804880.487765651] [listener]: I heard: [Hello World: 29]
    :
SDKのインストール
(1)公式レポジトリからサンプルのコードを取得します。※HOME直下で実行してください。このあとのBuildで失敗する可能性があります。
~ $ git clone https://github.com/unitreerobotics/unitree_ros2.git
(2)依存関係のライブラリのインストール
sudo apt install ros-foxy-rmw-cyclonedds-cpp
sudo apt install ros-foxy-rosidl-generator-dds-idl
(3)cyclone ddsのコンパイル
Cycloneddsをコンパイルする前に、ターミナル起動時にROS2環境が読みこまれていないことを確認します。
「~/.bashrc」ファイルに「source/opt/ros/foxy/setup.bash」が追加されている場合はコメントアウトが必要
sudo apt install gedit
sudo gedit ~/.bashrc
# source /opt/ros/foxy/setup.bash
(4)コンパイルの実行
もしコンパイルが失敗する場合はterminalを立ち上げなおして、正しい環境かを確認するために、ros2を実行し、”command not found” と表示されることを確認してください。
cd ~/unitree_ros2/cyclonedds_ws/src
git clone https://github.com/ros2/rmw_cyclonedds -b foxy
git clone https://github.com/eclipse-cyclonedds/cyclonedds -b releases/0.10.x
cd ..
colcon build --packages-select cyclonedds #Compile cyclone-dds package
(5)unitree_goとunitree_apiパッケージをコンパイル
buildが完了したら、引き続き同じterminalでfoxyのsetup.bashをし、その後全体のコンパイルをします。
source /opt/ros/foxy/setup.bash
colcon build
実行
一度OSを再起動し、下記コマンドを実行することでunitree関連のrosを利用することができるようになります。
Topicの確認
外部PCを通してGo2本体のトピックを確認することができます。
$ source ~/unitree_ros2/setup.sh
$ ros2 topic list
/api/assistant_recorder/request
/api/assistant_recorder/response
/api/audiohub/request
/api/audiohub/response
/api/bashrunner/request
/api/bashrunner/response
/api/config/request
/api/config/response
/api/fourg_agent/request
/api/fourg_agent/response
/api/gas_sensor/request
/api/gas_sensor/response
/api/gesture/request
/api/gpt/request
/api/gpt/response
/api/motion_switcher/request
/api/motion_switcher/response
/api/obstacles_avoid/request
/api/obstacles_avoid/response
/api/pet/request
/api/pet/response
/api/programming_actuator/request
/api/programming_actuator/response
/api/robot_state/request
/api/robot_state/response
/api/sport/request
/api/sport/response
/api/sport_lease/request
/api/sport_lease/response
/api/uwbswitch/request
/api/uwbswitch/response
/api/videohub/request
/api/videohub/response
/api/vui/request
/api/vui/response
/arm_Command
/arm_Feedback
/audiohub/player/state
/audioreceiver
/audiosender
/config_change_status
/frontvideostream
/gas_sensor
/gesture/result
/gnss
/gpt_cmd
/gptflowfeedback
/lf/lowstate
/lf/sportmodestate
/lio_sam_ros2/mapping/odometry
/lowcmd
/lowstate
/multiplestate
/parameter_events
/pctoimage_local
/pet/flowfeedback
/programming_actuator/command
/programming_actuator/feedback
/public_network_status
/qt_add_edge
/qt_add_node
/qt_command
/qt_notice
/query_result_edge
/query_result_node
/rosout
/rtc/state
/rtc_status
/selftest
/servicestate
/servicestateactivate
/sportmodestate
/uslam/client_command
/uslam/cloud_map
/uslam/frontend/cloud_world_ds
/uslam/frontend/odom
/uslam/localization/cloud_world
/uslam/localization/odom
/uslam/navigation/global_path
/uslam/server_log
/utlidar/client_cmd
/utlidar/cloud
/utlidar/cloud_base
/utlidar/cloud_deskewed
/utlidar/grid_map
/utlidar/height_map
/utlidar/height_map_array
/utlidar/imu
/utlidar/lidar_state
/utlidar/mapping_cmd
/utlidar/range_info
/utlidar/range_map
/utlidar/robot_odom
/utlidar/robot_pose
/utlidar/server_log
/utlidar/switch
/utlidar/voxel_map
/utlidar/voxel_map_compressed
/uwbstate
/uwbswitch
/videohub/inner
/webrtcreq
/webrtcres
/wirelesscontroller
/wirelesscontroller_unprocessed
/xfk_webrtcreq
/xfk_webrtcres
ステートの取得
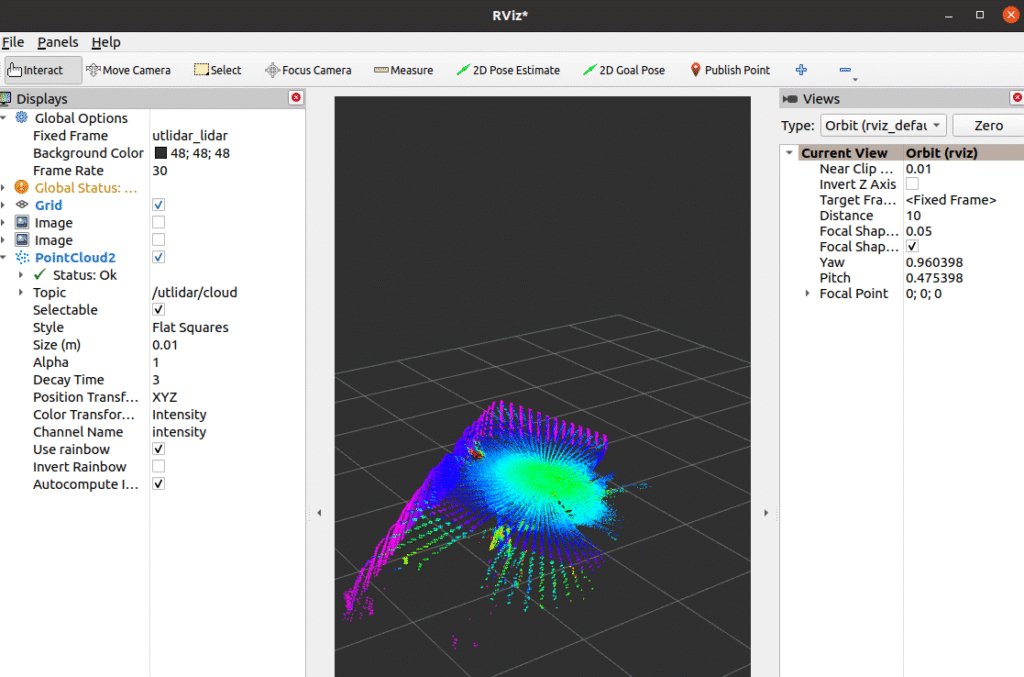
Rvizによる2D点群の取得
下記コマンドでrvizを立ち上げ、/utlidar/cloudをsubscribeすることで、表示することができます。
$ ros2 run rviz2 rviz2
スポーツモードのステート確認
$ ros2 topic echo /sportmodestate
stamp:
  sec: 1750415646
  nanosec: 521781075
error_code: 100
imu_state:
  quaternion:
  - -0.9527515172958374
  - 0.009728764183819294
  - -0.006678077857941389
  - 0.3035217225551605
  gyroscope:
  - -0.008522114716470242
  - -0.0010652643395587802
  - -0.015978964045643806
  accelerometer:
  - -0.16160862147808075
  - -0.28371289372444153
  - 9.552865028381348
  rpy:
  - -0.022594517096877098
  - 0.006819368805736303
  - -0.6168944835662842
  temperature: 79
mode: 0
progress: 0.0
gait_type: 0
foot_raise_height: 0.0
position:
- -0.051570795476436615
- -0.021044490858912468
- 0.30955570936203003
body_height: 0.3208828866481781
velocity:
- 0.0029916828498244286
- 0.007184749469161034
- -0.018200717866420746
yaw_speed: -0.015978964045643806
range_obstacle:
- 0.0
- 0.0
- 0.0
- 0.0
foot_force:
- 0
- 0
- 0
- 0
foot_position_body:
- 0.0
- 0.0
- 0.0
- 0.0
- 0.0
- 0.0
- 0.0
- 0.0
- 0.0
- 0.0
- 0.0
- 0.0
foot_speed_body:
- 0.0
- 0.0
- 0.0
- 0.0
- 0.0
- 0.0
- 0.0
- 0.0
- 0.0
- 0.0
- 0.0
- 0.0
---
スポーツモードのサンプル実行
下記コマンドでビルドしたのち、サンプルを実行します。
$ cd ~unitree_ros2/example
$ colcon build
./install/unitree_ros2_example/bin/sport_mode_ctrl
-0.0833535, -0.0189747, -0.999679
-0.0833573, -0.018973, -0.999679
-0.0833374, -0.0189771, -0.999682
-0.0833443, -0.018988, -0.999672
-0.083346, -0.0189807, -0.999645
-0.0833503, -0.0189889, -0.999643
-0.0833514, -0.0189817, -0.999636
-0.0833541, -0.018991, -0.999646
-0.0833561, -0.0189861, -0.999648
-0.08335, -0.0189874, -0.999625
-0.0833472, -0.0189902, -0.999627
-0.083342, -0.0190032, -0.999613
-0.0833515, -0.0189991, -0.999619
-0.0833447, -0.0189977, -0.999614
-0.0833523, -0.0189953, -0.99963
-0.0833481, -0.0189962, -0.999642
-0.0833432, -0.0189954, -0.99965
-0.0833301, -0.0189984, -0.999652
-0.0833259, -0.0190054, -0.999662
-0.0833336, -0.0189955, -0.999674
-0.0833326, -0.0189913, -0.999683
-0.0833351, -0.0189909, -0.999689
-0.083335, -0.0189916, -0.999698
-0.0833422, -0.018996, -0.999716
おわりに
一通りROS2を使用した環境構築及びテスト実行をやってみました。スタックした方はご連絡ください